
I find myself often making things, completing projects, and later realizing, "Gee, I could've shared how to make that!" I try hard to think of projects that epitomize the idea of working with your supply on hand, when in reality, everything I do involves that supply in some way or another. I just don't realize it because that's how I've always done things, and it doesn't stand out as out-of-the-ordinary anymore. Take my latest craft, for instance: I have a wedding coming up this weekend, and rather than go buy a new dress, I decided I'd wear a nice one already in my closet and make myself an awesome hair accessory to class it up even more. I love the idea of a fascinator(I guess I find them fascinating...), and with the amount of craft bits and such lying around, I was sure I could pull one together easily.

Now, I'm not saying I hopped over to the sewing workshop, pulled out exactly what I needed, and whipped up a fascinator, as if by magic. In fact, I made a trip to the fabric store for a piece of fabric in a color matching the dress, as well as to the dollar store for some matching tulle. However, I checked my inventory FIRST, before buying anything. I already had some hairbands, black lace, feather, padding for the base and such in stock, so those items lead to how I would put the final project together, what it would look like, and what I ultimately needed to purchase to complete the fascinator. That's how I properly use my resources. Now, on with the crafting!

I put on the headband where I planned to wear it for the wedding, slipped a piece of paper underneath and traced the shape of the base I was going to build my fascinator on. I chose to drop mine a little behind my ear, and curve it slightly outwards towards the top to accommodate the flower I was going to add. Actually, it ended up looking like an ear. I cut out the paper and used it as a pattern to cut out a foam base. This piece is recovered from the bust lining of a bridesmaid's dress - go figure.

I laid the lace out on top of the fuchsia fabric, to mimic the look of the dress. You can see the actual dress in the top left hand corner of the second photo. It's black with a fuchsia-colored lace overlay.

I folded the fabric over on itself, with the lace inside, and pinned the foam shape to the three layers.

Using the zipper foot attach for more clearance, I stitched around the foam shape, leaving an opening for turning the fabric.

I used pinking shears to trim the fabric around the stitching, and clipped the curves for a cleaner-looking turned piece.

I stuffed the foam shape into the fabric pocket, lace side out. This proved difficult, as the foam was very sticky and didn't want to do what I told it to. I may have used force.

After turning the rough edges inside to close the hole, I top-stitched the entire piece with black thread.

At this point, I put the headband back on and tried positioning the base where I wanted it to sit. I took note, removed the headband and hand-stitched the base in place. I made sure that I began high enough up on the headband, where there are teeth. Doing this looks the piece and thread in place and prevents the entire fascinator from sliding off the headband!

There you have it - one base.

Next, I positioned the netting I wanted to use, and pinned it into place. I didn't sew it yet, in case I wanted to change the positioning in relation to the flower later on. On a side note, can you believe I found this piece of netting in a parking lot?! Those threads you see were originally white - I colored them fuchsia to match my dress, using a permanent marker.

Next, the flower: I got this little roll of tight-knit tulle from the dollar store. Actually, it's more of a fine, iridescent mesh, but synthetic, so I knew that I could melt the edges to finish them. I cut out petal shapes of varying sizes, and, carefully holding the fabric close to a candle flame, I gently melted the edges. Note that this only worked for synthetic fabrics, and that you should test your fabric first to determine it flammability. Mine would continue smoldering if I wasn't careful!

I left the bottom ends of the petals unfinished, and gathered them to form the rounded petal shape, using a needle, thread and a long running stitch.

I made a base to which I would attach the petals, using more of the fuchsia fabric. I sewed a long running stitch around the outer edge of a small circle...

...then I gathered the fabric together and flattened the piece, tying off my thread. This is called a "yoyo", and it can be used for a whole myriad of crafting projects, but I decided it would make a good base for the flower blossom.

I hand-stitched the petals, larger ones first, in a circle around the base, layered as I went until I used up all the petals. I made about 15 petals total.
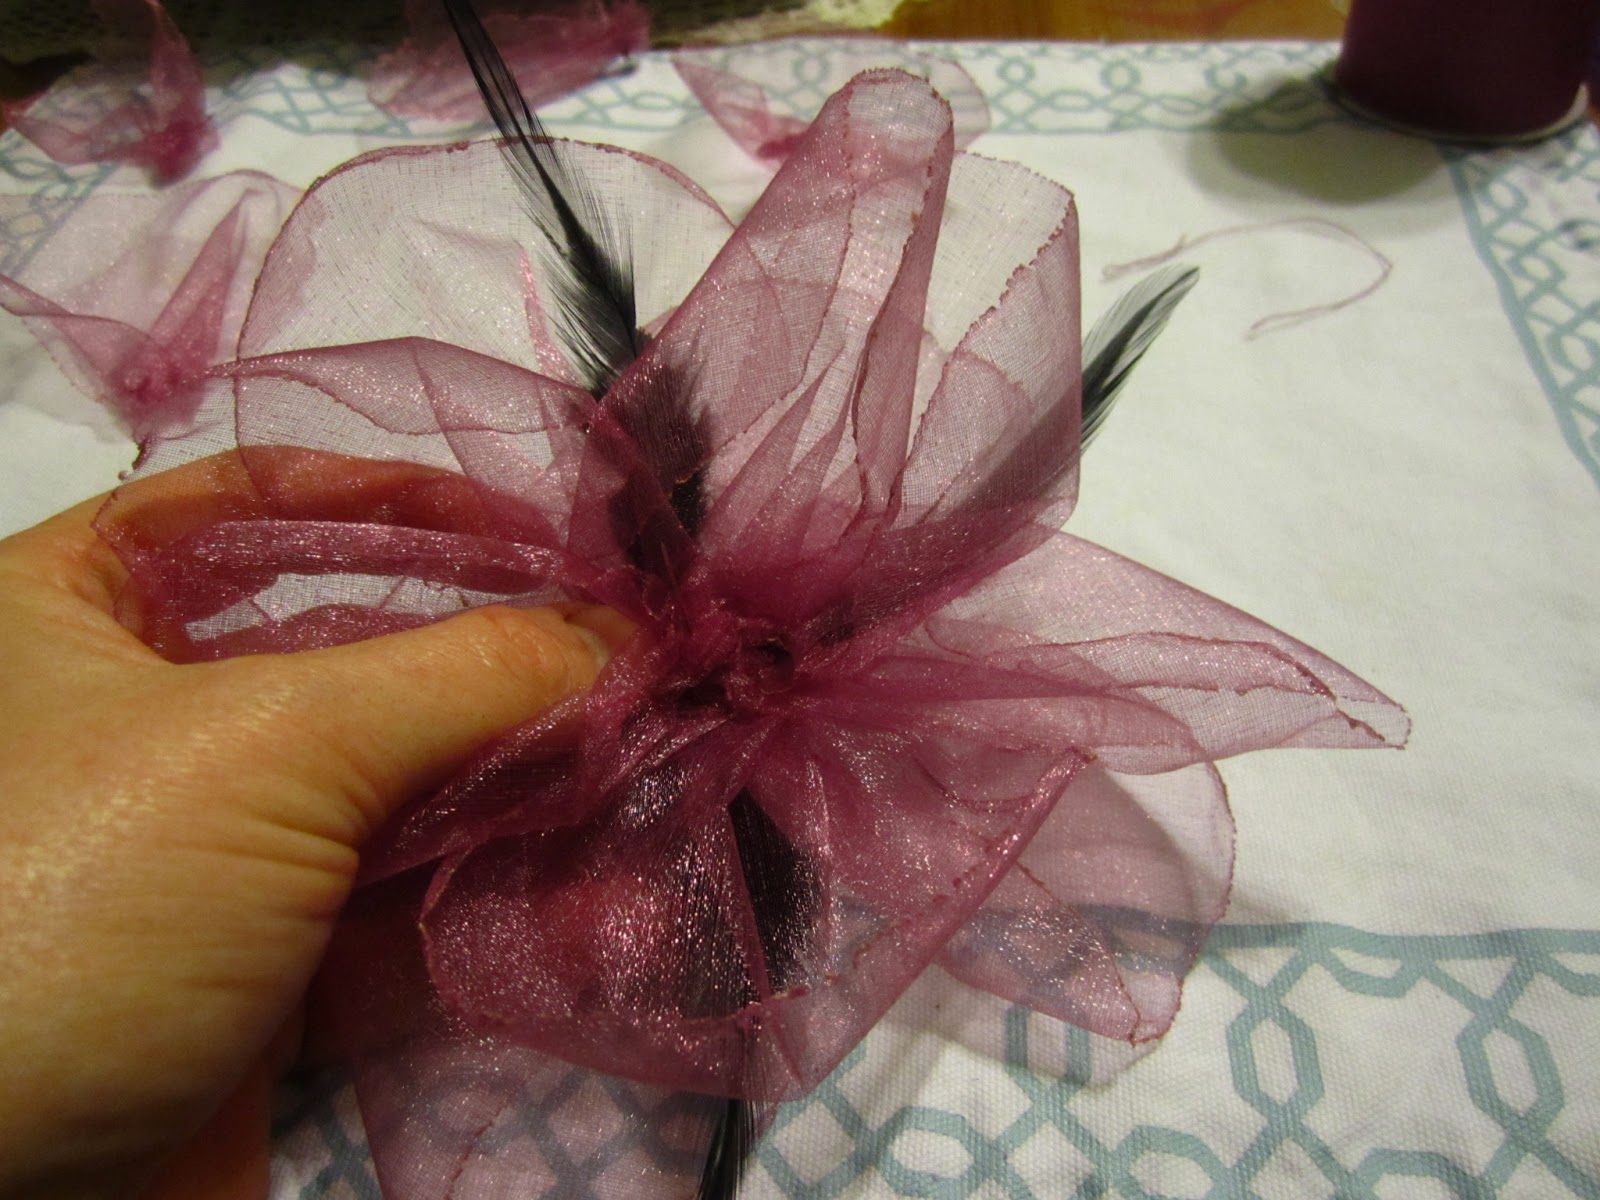
I also added a few black feathers, tacking them in while I was stitching the petals to the base.

Finally, I tested the flower positioning on the netting and headband, trying it on and moving it around until I liked the way it looked. I stitched everything together to the base.

And there you have it, one very fascinating fascinator to match my dress and class up my outfit for a friend's wedding! I'll post the entire outfit after the wedding, so stay tuned!
Now it's your turn - go craft something fascinating!
1 comment:
I love it....it turned out really pretty !
Post a Comment